how to make wig look natural - 9 pro tips for a flawless hairline and seamless blend

Professional Guide: Make a Wig Look Truly Natural Without Looking Overdone
If you've ever asked yourself how to make wig look natural and felt overwhelmed by the choices, this extended guide walks you through realistic, actionable techniques that both beginners and seasoned wig wearers can use. In this long-form article you'll find a structured roadmap: preparation, installation, hairline work, blending, styling, and upkeep. Each section contains step-by-step tips, pro shortcuts, and troubleshooting notes to ensure your wig delivers a believable, comfortable, and long-lasting result. The focus here is practical: learn how to make wig look natural using simple tools, the right products, and an eye for subtlety rather than theatrical perfection.
Why Naturalness Matters: Beyond Aesthetics
Wearing a wig is not just about changing hair; it affects your silhouette, facial framing, and confidence. When someone asks how to make wig look natural, they usually mean avoiding the obvious telltale signs: a harsh hairline, bulky cap, mismatched density, or unnatural shine. This guide treats naturalness as a combination of texture, movement, scalp illusion, and integration with your natural hair or skin tone. Instead of chasing a "perfect" look, aim for believability — subtle transitions, believable roots, and a hairline that reads like natural growth.
Essential Supplies and Tools
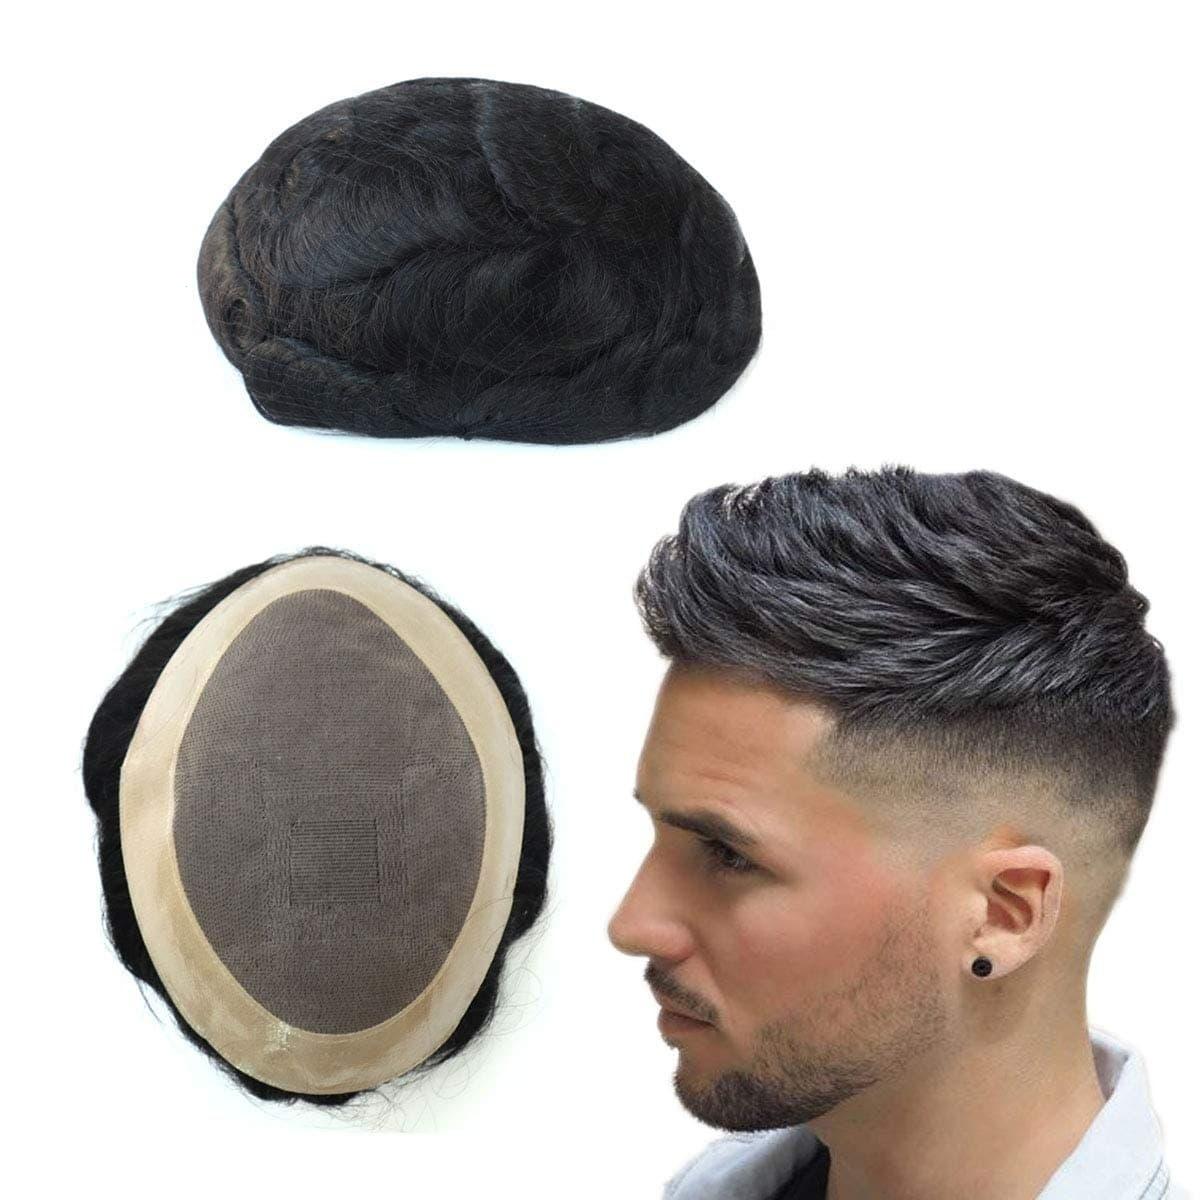
- Wig cap (thin, breathable, close to your scalp tone)
- Fine-tooth comb and wide-tooth comb
- Shears for texturizing (or thinning shears)
- Lace adhesive or gel for lace fronts, removable tape or glue for units
- Scalp concealer or foundation in your skin tone
- Plucking tweezers and a magnifying mirror
- Heat protection spray and low to medium heat styling tools
- Dry shampoo or powder to remove shine
- Elastic band or wig grip for secure fitting

Key Concepts to Remember
The following principles will guide many of the techniques below: density matching (not too thick at the hairline), softened edges, strategic parting, and variation in hair length and direction. When you ask how to make wig look natural, your answer will involve layers — literal hair layers and layers of finishing techniques.
Step-by-Step: 9 Pro Tips to Achieve a Flawless Hairline and Seamless Blend
Below are nine practical, numbered tips you can follow in sequence. They are designed to work together; skipping steps may still help, but following the full sequence will produce the most convincing results. These tips cover everything from cap preparation to final styling nuances.
Tip 1 — Choose the Right Base and Color Match
Start by selecting a wig cap base and color that complements your scalp. If your wig is a lace front, choose lace that matches your skin undertone or can be tinted with concealer. If the wig is a full cap, use a thin, skin-tone wig cap underneath to reduce cap shine. For color, pick a shade that works with your eyebrows and complexion; extremes often read as costume unless intentionally styled. Color blending techniques such as lowlights, highlights, or root darkening create depth. Use small sections of hair dye or hair chalk to create darker roots, which is a common natural characteristic.
Tip 2 — Customize the Hairline: Pluck, Thin, and Soften
Mass-produced hairlines are often dense and uniform. Use tweezers to carefully pluck hairs along the front to create negative space and mimic natural baby hairs. Don't overpluck — the key is irregularity: remove small clusters to form a slightly uneven line, then blend with thinning shears. Create very fine short hairs at intervals to simulate natural shorter growth around the forehead. This is one of the most powerful answers to the question how to make wig look natural, since a believable hairline sells the entire illusion.
Tip 3 — Bleach or Tone Knots (For Lace Fronts)
Bleaching knots reduces the visible dark dots that reveal a lace wig. Use a controlled bleach-and-developer mix and apply only to the area where knots are seen; timing is essential to avoid weakening strands. If you prefer not to bleach, use a tiny dab of foundation or concealer matched to your scalp applied to the underside of the lace to minimize contrast. After bleaching, tone out brassiness and apply a thin layer of sealer to strengthen the knots. This technical step elevates realism and demonstrates a professional approach to how to make wig look natural.
Tip 4 — Create a Realistic Part
A stiff, perfect part screams "wig." To avoid this, create a soft, slightly off-center part and use a root touch-up powder or scalp concealer along the part to mimic scalp depth. You can also sew in a small section of lace or use a monofilament top to simulate hair emergence. Another trick is to set a few hair strands across the part to introduce randomness. The part is the focal point for viewers — invest time here to master natural light reflection and shadow.
Tip 5 — Use Baby Hairs and Strategic Short Layers
Baby hairs are not just short hairs at the forehead; they're tiny irregular pieces that break the uniform edge and give a lived-in look. Create subtle baby hairs with a small razor or scissors, and style them with a lightweight gel or mousse. Avoid heavy gels which harden and become visible; instead, seek a pliable hold that moves with your expression. On the rest of the wig, use texturizing shears to introduce shorter layers around the face to soften the transition from wig to skin.
Tip 6 — Adjust Cap Fit and Positioning
A wig that's too tight or too loose will sit incorrectly. Use adjustable straps, a wig grip, or sew in an elastic band to achieve a snug fit that keeps the lace flush to your skin without tension. When applying adhesive, apply thin layers: too much glue causes lumps and shine, too little reduces adhesion. Press the lace down with a soft, flat tool or a clean toothbrush to ensure the lace lays flat. Proper fit reduces gaps and prevents the crown from lifting — both giveaways of a wig.
Tip 7 — Control Shine and Texture
Many synthetic wigs are unnaturally shiny. Use dry shampoo, baby powder, or a very small amount of matte styling product to tone down gloss. If the wig is human hair, apply a light anti-frizz serum sparingly. Use heat tools on low to medium settings to create natural movement; a slight wave is more convincing than perfect stick-straight hair. When doing any chemical or heat work, use a heat protector and test on a small section to avoid damage that will betray a wig's artificiality.
Tip 8 — Blend with Your Natural Hair and Face Shape
If you have any natural hair left, use it to mask parts of the wig edge or blend into the hairline. Cornrow or flat-tuck the edges when wearing a wig cap, then let a thin strip of natural baby hair out to merge with the wig's baby hairs. Consider contouring techniques near the temples: a slight adjustment in makeup around the hairline can simulate shadow where hair grows. Matching density is crucial: if the wig is much thicker than your natural hair around the face, thin it to match.
Tip 9 — Finalize with Styling and Movement
A wig that moves like real hair is much more believable. Use lightweight texturizing spray to create separation and movement. Style in multiple directions: part once, then finger-comb through, add soft waves, and shake out the fibers. Use your fingers more than combs when finishing to maintain a natural fall. Periodically mimic real hairstylist finishing touches — scrunch, light backcombing at the roots, and smoothing surfaces with hands rather than tools. These finishing touches answer the practical side of how to make wig look natural by creating natural choreography between hair and head movement.
Common Problems and Quick Fixes
Visible Lace or Edge Lifting
Lift can be corrected by reapplying adhesive around specific spots, using a small amount of alcohol to clean the area first. If the lace edge is too visible due to color mismatch, apply a small amount of foundation along the lace edge and blend immediately. Repositioning the cap slightly forward or backward often hides problematic sections.
Unnatural Part Line
If your part looks too rigid, loosen it with a comb and sprinkle a scalp powder to deepen the illusion. Micro-misting with water and a light spray will let the hair settle naturally. Adding a few hairs across the part line creates shadow and asymmetry.
Too Much Volume or Density
Work with thinning shears to remove bulk, but do so gradually. Take off small sections and step back to evaluate. When in doubt, thin under layers first rather than at the surface.
Maintenance and Long-Term Care
To maintain the natural look, follow these habits: wash the wig using gentle sulfate-free shampoos, detangle from tips to roots, air-dry on a mannequin head for shape retention, and store the unit on a stand to prevent creases. For human-hair wigs, occasional salon-grade conditioning treatments will restore luster and flexibility. For synthetics, low-heat steamers can revive curls. Regular maintenance prevents the stiffness and wear that expose a wig's construction.
Product Recommendations and Ingredients to Avoid
Avoid heavy mineral-oil-based serums that create a plastic sheen. Opt for lightweight silicone serums in small amounts for human hair, and water-based sprays for synthetics. When selecting adhesives, choose reputable medical-grade brands and patch-test for skin sensitivity. Scalp powders, dry shampoos, and color-correcting sticks are excellent for quick touch-ups and daily realism.
Professional Touches That Make a Big Difference
- Monofilament or hand-tied tops for scalp realism
- Customized coloring and root smudging by a trained colorist
- Professional plucking and hairline customization
- Elastic band installation for secure wear
- Micro-blending and scalp tattoo techniques (for long-term solutions)
These professional additions can be mixed with DIY methods depending on budget and desired longevity. They address the deeper structural causes of an unnatural look: cap construction, hair direction, and density mapping.
Styling Ideas to Enhance Natural Appeal
Consider layered cuts, soft waves, face-framing pieces, and natural parting asymmetry. Rotate between slicked-back looks with controlled baby hairs and loose, lived-in waves. Shorter lengths can be easier to make realistic due to lighter density needs, while longer wigs require careful weight distribution and texturizing to avoid the "wig blanket" appearance.
Seasonal Tips
In humid weather, prioritize anti-frizz products and humidity-resistant sprays. In cold seasons, prevent dry-static by using leave-in conditioners and avoid hats that rub edges. For active or athletic wear, use secure anchors like wig bands and sweat-resistant adhesives.
How Often Should You Rebuild the Hairline?
Depending on wear frequency, tweezing and minor touch-ups every few weeks maintain a natural edge. More intensive work like re-bleaching knots or re-sewing a band might be necessary every few months if you wear the wig daily. Periodic professional tune-ups extend the life and realism of any wig.
How to Make Wig Look Natural: Summary Checklist
- Match cap color and lace to your skin tone
- Softly pluck and thin the hairline
- Correct knot visibility with bleaching or concealer
- Create a soft, slightly irregular part
- Use baby hairs and subtle short layers
- Ensure a snug, secure cap fit
- Tone down shine and add natural texture
- Blend with your natural hair if possible
- Finish with movement-focused styling
Repeat the bold keyword throughout your preparation and finishing steps: when planning your approach, remind yourself how to make wig look natural is primarily about subtlety and believable variation rather than theatrical symmetry.
Real User Tips and Small Hacks
Use a clean toothbrush for pressing lace into adhesive for a gentle, natural contour. Try baby oil on a cotton swab to remove stubborn adhesive residues from skin (not the lace). For quick color fixes, eyeshadow in a matching tone can act as a root smudge. When traveling, carry a mini styling kit with a small comb, a spray bottle, and touch-up powder to keep the hairline intact.
When to Consult a Professional
If you struggle with scalp sensitivity, persistent lifting, color matching, or complex customization (like monofilament tops or scalp micropigmentation), seek a professional wig stylist. They can install permanent or semi-permanent solutions, perform color corrections, and teach specialized techniques that are hard to self-apply.
Conclusion
Learning how to make wig look natural is a process of attention to small details: hairline work, parting, texture, and fit. By combining these nine pro tips with regular maintenance and a few professional touch-ups, you can achieve a seamless, believable look that enhances your features and feels comfortable in daily life. Take your time, practice, and keep a minimalist mindset — less is often more when crafting an authentic hairline and overall blend.
Optional FAQ
Q: How long does the customization process take?
A: Basic plucking and fit adjustments take 30–60 minutes. Bleaching knots, professional fitting, and styling can take several hours depending on complexity.
Q: Can synthetic wigs look as natural as human hair?
A: High-quality synthetic wigs with matte fibers and realistic density can look very natural, especially when textured and de-glossed. Human hair offers more styling versatility, but both can be convincing when properly customized.
Q: How do I avoid damaging a lace wig when bleaching knots?
A: Use a targeted, brief application with low-volume developer and monitor closely; always neutralize and condition the lace after processing. If unsure, seek a professional.
For continued improvement, keep testing small adjustments and document what changes make the biggest difference — refining your technique is the final secret to consistently answering how to make wig look natural with confidence and repeatable success.
Related products
Blog
- where is soul lady wigs located near me - Find Nearby Stores, Hours, Map and Customer Reviews
- does kim kardashian wear wigs explained with expert insights and behind the scenes styling
- how to take shine out of wig the smart way using simple home remedies and pro tips for a natural matte finish
- Ultimate 2026 Guide to Gray Wigs for Every Age with Styling Tips, Care Advice, and Top Picks
- Where to Donate Used Wigs and How to Prepare Them for Donation - Top Charities, Hospitals and Community Drives
- can you wear a wig during a mammogram — patient guide to clinic rules, comfort tips and what technicians say
- Easy DIY tutorial on how to make yarn wigs at home for beginners and pros with step by step tips
- 2025 Ultimate Black Bob Wig Guide Buying Styling and Care Tips for a Chic Natural Look