how to revamp a wig Step by Step DIY Guide with Budget Friendly Tips to Transform Your Look

how to revamp a wig: practical overview and SEO-minded approach
Revitalizing an old wig or transforming a new one into a personalized statement piece is a satisfying, cost-effective way to change your look without committing to permanent salon services. This comprehensive guide focuses on how to revamp a wig with step-by-step DIY instructions, budget-friendly tips, and maintenance strategies designed to increase longevity and style versatility. Whether you have a synthetic piece, a lace front, or a human-hair wig, these techniques will help you update texture, shape, color, and fit while keeping a keen eye on affordability and sustainable choices.
Why consider a DIY wig refresh?
There are many reasons to learn how to revamp a wig: save money, tailor the look to your face shape, practice creative styling, or simply refresh a tired piece. For many, a home transformation can breathe new life into a wig, especially when the goal is a subtle update rather than a full replacement. This guide explains materials, tools, and practical steps so that even beginners can achieve professional-looking results.
Essential materials and tools
- Wide-tooth comb and boar bristle brush for smoothing and detangling
- Sharp hair scissors and thinning shears for precise cutting
- Styling clips and a wig stand or mannequin head to secure the piece while working
- Heat protectant and a low-temperature flat iron or curling wand for heat-safe synthetic or human-hair wigs
- Wig-specific shampoo and conditioner; leave-in detangler
- Needle and thread (nylon or polyester) for cap repairs and customizations
- Wig glue or wig tape for lace-front adjustments
- Fabric dye or wig-safe color sprays for color updates; remember that dyeing synthetic fiber is different from dyeing human hair
- Dry shampoo, texturizing spray, or mousse for styling and adding volume
- Optional: ventilating needle for adding or replacing knots on lace, elastic band for improved fit, and hairline plucking tools to soften lace fronts
Preparation: assessment and planning
Before you start, inspect the wig for cap damage, missing hair knots, smell, and fiber condition. Decide on your desired result—trim, restyle, color, or full reconstruction. Planning helps manage costs: list required supplies and prioritize changes that deliver the most visual impact for the least expense. If you are new to DIY wig transformation, begin with smaller updates (trimming, reshaping, adding layers) and progress to dyeing or heat styling as you gain confidence.
Step-by-step process: core techniques to revamp any wig
1. Deep clean and restore
Cleanliness is the foundation of a successful makeover. For both human and high-quality synthetic wigs, use a wig-specific shampoo and lukewarm water. Gently soak the wig, lightly squeeze to remove residue, then condition the ends to restore softness. Avoid aggressive rubbing to prevent tangling. Rinse thoroughly and pat dry with a towel; place the wig on a stand to air dry fully before further work. This step not only refreshes appearance but also reveals structure issues that need attention.
2. Detangle and prep the fiber
After drying, use a wide-tooth comb to gently remove knots, always starting at the ends and working upward. For synthetic fibers, brush with a moderate boar-bristle brush designed for wigs or a synthetic-specific comb to avoid frizz. Apply a light leave-in conditioner or detangler spray for smoother styling. Proper detangling is essential to achieve a professional result and reduce hair loss during cutting or restyling.
3. Reshape the haircut
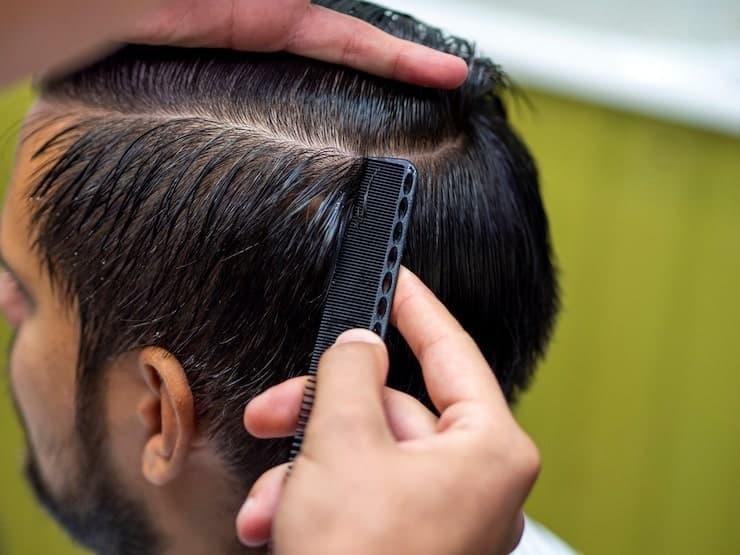
Trimming and layering can radically change a wig’s silhouette. Secure the wig on a stand, section hair, and cut in small increments to avoid over-trimming. Use point-cutting techniques with sharp scissors to create soft edges, or thinning shears to remove bulk without losing length. When planning layers, always consider face shape: longer layers for round faces, shorter choppy layers for elongated looks. For lace-front pieces, carefully trim front hairs to mimic a natural hairline—less is more.
4. Recreate a natural hairline and part
For lace-front wigs, softening the hairline can transform an artificial look into something convincing. Pluck a few hairs with tweezers to create a gradual density fade, and use a little concealer or foundation on the lace to match your scalp tone if needed. Practice restraint: over-plucking leads to unnatural gaps. For parts, comb hair while the wig is dry and set with a flat iron on low heat if appropriate, or use styling gel for synthetic fibers formulated to handle heat.
5. Reroute or add volume
Adding volume can be achieved by layering, backcombing at the crown, or sewing in lightweight wefts to specific areas. For a fuller look without heat, use volumizing powder or a texture spray at the roots. If the cap lacks structure, sew in a small elastic band inside to tension the cap and lift the crown area, improving fit and volume simultaneously.
6. Heat styling safely
Human-hair wigs are heat-tolerant, but synthetic fibers vary. Confirm the wig’s heat resistance before using hot tools. Always apply a heat protectant and use the lowest effective temperature. For curls, wrap small sections around the barrel and hold briefly; for waves, try pin curling and allowing the fiber to cool completely before unpinning. For heat-friendly synthetics, a low-heat flat iron can smooth the fiber; for non-heat synthetics, use steam or cold-setting rollers to reshape without damage.
7. Dyeing and color ideas on a budget
Color changes can be dramatic but require caution. Human hair can be dyed like natural hair, while synthetic fibers require specialized dye or fabric spray. For cost-efficient updates, consider temporary color sprays, clip-in color pieces, or adding balayage highlights using safe, fiber-specific dyes. Test dye on a small section and allow ample drying time. For dramatic color transitions, consult a professional if you are unsure—cheap mistakes in color are often costly to fix.
8. Add accessories and modifications

Small changes can create big style upgrades. Sew in headbands or attach hairpieces for dimension. Add bangs by cutting carefully or attach modular fringe pieces if uncertain; this saves the original wig while offering a different look. Use decorative pins or barrettes to modernize a classic wig without altering the structure.
Budget-friendly strategies to revamp a wig
- Shop for multipurpose tools: a single quality pair of scissors and a versatile styling brush will serve all future projects.
- Use household items wisely: old T-shirts as drying rags, bobby pins for sectioning, and ice-cube trays for making DIY heatless curlers.
- Refresh rather than replace: many wigs only need surface-level care—shampoo, trim, and restyle—to look contemporary.
- Swap or barter skills: if you’re good at sewing, trade cap adjustments with a friend who can color or cut.
- Use temporary color options like sprays or clip-ins when you want seasonal changes without permanent cost.
Long-term care and maintenance
To keep your revamp looking sharp, follow a gentle maintenance routine. Wash infrequently using wig-specific products, detangle daily with care, and store on a stand or in a breathable bag to maintain shape. Avoid exposure to high heat and prolonged sunlight to reduce fiber breakdown. Regularly inspect the cap and knots to catch wear early; resew loose wefts and treat lace gently to extend lifespan.
Troubleshooting common issues
- Frizzed synthetic fibers: try a specialized conditioner and cold-setting techniques; avoid harsh brushing.
- Uneven layering: soften edges with point-cutting and blend with thinning shears.
- Cap slipping: add an adjustable elastic band or wig grip strip for improved stability.
- Color fading: use UV-protectant sprays and minimize frequent washing to preserve dye.
- Lace damage: use fabric glue or a patch of matching lace to repair small tears, or seek a professional for extensive repairs.
Creative finishing touches and styling ideas
Experiment with braiding, partial updos, and asymmetrical cuts to modernize an older wig. For texture, combine light mousse with scrunching on low-heat synthetic pieces or use finger waves for an elegant vintage finish on human-hair wigs. Try micro-braids or twist-in extensions for extra length without committing to a full permanent change. Layering with accessories like scarves or headbands can also mask minor imperfections while lending a fashion-forward vibe.
Checklist before you finish
- Is the cap secure and comfortable?
- Does the hairline look natural when worn?
- Are the ends healthy-looking and free of frizz?
- Have you tested the wig under the lighting and conditions you normally wear it?
- Do you have a maintenance plan to keep the look fresh?
SEO-minded closing thoughts on learning how to revamp a wig
Understanding how to revamp a wig empowers you to make intentional aesthetic choices while saving money and reducing waste. By following these steps—cleaning, detangling, reshaping, color updating, and finishing with maintenance—you can transform a forgotten piece into a daily favorite. The key is planning, testing in small steps, and gradually building skill. Use the checklist and budget tips to achieve a professional outcome without a professional price tag.
If you enjoyed this stepwise approach and want to deepen your skills, practice on inexpensive wigs first and gradually advance to more delicate or expensive pieces. Keep a small toolkit of wig-safe products and invest selectively in tools that promise longevity and versatile use.
Frequently Asked Questions
- Q: Can I safely dye a synthetic wig at home?
- A: Most standard fabric dyes will not work on common synthetic fibers like kanekalon; specialized synthetic dye or temporary color sprays are safer. Always test on a hidden section first and follow product guidelines precisely.
- Q: How often should I wash a wig after a revamp?
- A: Wash sparingly—about every 8–12 wears for synthetic wigs and every 10–15 wears for human-hair wigs, unless it becomes soiled sooner. Over-washing shortens lifespan.
- Q: Is it worth resewing wefts and repairing the cap myself?
- A: Basic resewing is a cost-effective DIY fix if you have a needle and thread and a steady hand. For complex cap structure repairs or ventilating lace, a professional service may be more efficient and durable.
Final tip: start small, document your steps, and personalize gradually—this is the practical path to mastering how to revamp a wig and making each transformation uniquely yours.
Related products
Blog
- Can You Straighten a Wig at Home - Step-by-Step Guide to Avoid Damage and Choose the Right Tools
- how to moisturize human hair wig at home 7 easy deep conditioning tips for silky soft strands
- do british lawyers wear wigs Today Why They Survive in Modern Courts and What It Means for Litigants
- how to style wig hair - 12 Easy Pro Techniques to Achieve Natural Movement and Long-Lasting Wear
- Quick local guide on where to buy a wig cap near me with top shops price tips and online picks
- What to use to take off wig glue safely discover the best removers and easy DIY methods
- Where to Buy Lace Wigs — Top Online Stores, Local Salons and Smart Shopping Tips
- Ultimate Styling and Care Guide for Honey Blonde Half Wig to Achieve a Natural Sun-Kissed Look